Task Reticle
Out of the box, Outlook’s Task View does not promote easy access to information. Sure all of your tasks are there, but that’s actually the problem: by default, there’s little visual prioritization given to the items, and they all therefore appear equally important.
Fortunately, Outlook does enable some reasonably deep customization of the visual aspects of the Task View which can bring into focus what’s important. With a few clicks, you can configure it to surface a more meaningful interface. Here is a layout I find to be particularly effective:
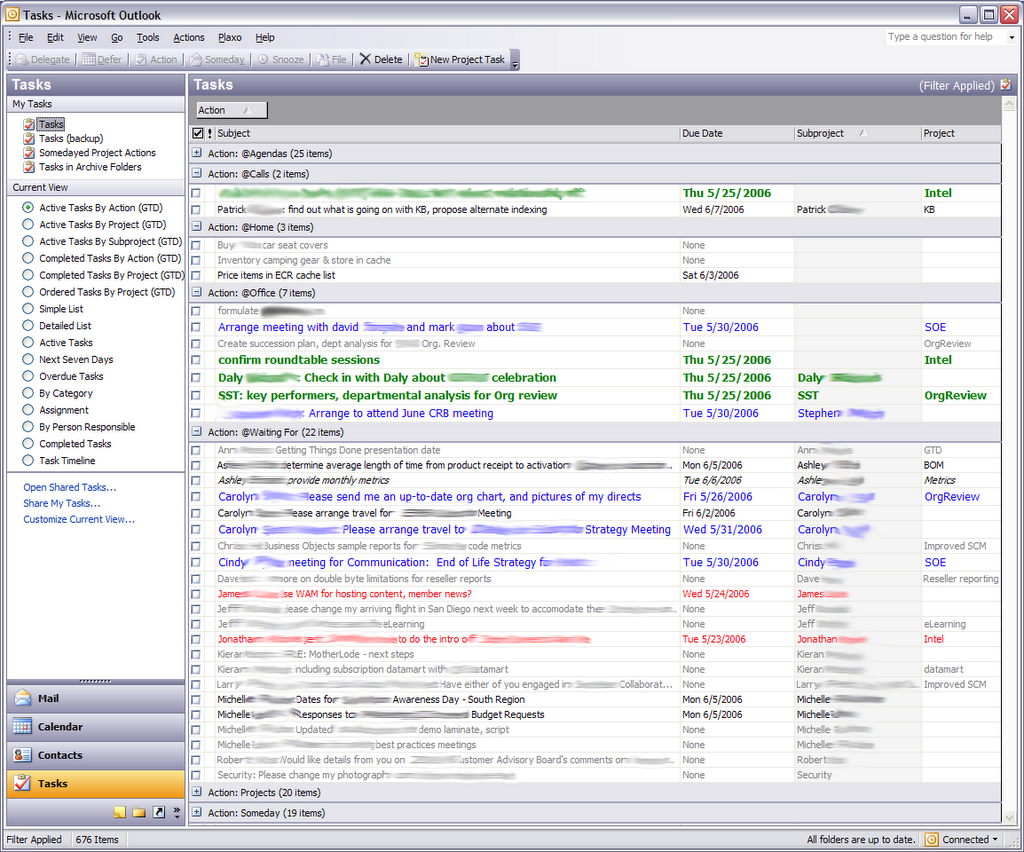
There are three important aspects to this view:
- Next actions (tasks) are grouped by context.
- Next actions show only the important information (what, when, who, and the associated project).
- Color and font choices dynamically highlight next actions based on urgency.
Group by Context
Following from the GTD principles, when endeavoring on any next action, context is the first resource (along with energy level, due date, etc.) that must be considered. It is therefore logical to arrange next actions first by this field. Presuming you are using the GTD Plugin for Outlook (described in a prior post), this is easily accomplished. From the list of “Current View” configurations at the far left, select the one titled “Active Tasks by Action (GTD)”. Note that the choice is actually inaccurately labeled – it should have been called “Active Tasks by Context (GTD)”, but some things are beyond our control and we’ll need to adjust to the plugin’s misappropriation of the word “Action”. It is misused consistently, thankfully, throughout the plugin (in the toolbar button, for example).
To get the actual grouping to occur, you may need to adjust the view’s “Group By” setting, to enact it based on Action. You can do this by selecting the menus “View / Arrange By / Current View / Customize Current View”, which will bring up a dialog from which you can press the “Group By…” button (as shown in the bottom-most window below). Pressing the “Group By…” button brings up a “Group By” dialog (showed in the top-most window below), where you’ll select “Frequently-used fields” at the bottom dropdown, then “Action” from the top dropdown. Be sure to also choose “Ascending” if not already selected.

The resulting view will look similar to, but not exactly like the example above. Further customization will be required, as outlined below.
Hone the Displayed Information
In my employment of GTD, I’ve found it very useful to know who is responsible for a next action. Clearly there are many for which I’m directly responsible, so if a name is not listed, I presume I’m the owner. But for many actions, particularly those in the “@Waiting For” context, there is another owner. I record this in two ways: I prepend the next action with the name followed by a colon, and I also record the name as the “subproject”. I chose subproject because it’s already “supported” by the plugin, and since the plugin has really no notion of whether the field should be a topic or a name, it’s complicit with my hijacking of the field.
I also find that when I review my next actions list, I want few fields to be visible. For example, I don’t really care about the full details of the next action (stored in the “Notes” field). I simply care about the what, when, who, and sometimes the project. I can certainly get to the additional details by actually opening a next action, but again, for quick review, I want less detail, not more.
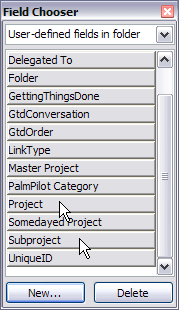
To accomplish this configuration, you must use the “Field Chooser” to modify those columns that are displayed. You can call the Field Chooser by selecting right clicking on any of the existing columns headings in the Task View (say, “Subject”), and choosing the “Field Chooser” from the popup. Ensure the drop down list at the top of the dialog is set to “User-defined fields in folder” to permit GTD-related columns to be manipulated. You can now drag columns to and from this dialog directly into place in the Task View. For example, you can see that I’ve added “Project” and “Subproject”, which I’ve accomplished by dragging them from the Field Chooser into place in the column heading bar in the Task View. From left-to-right across the column heading bar, I use “Complete”, “Priority”, “Subject”, “Due Date”, “Subproject”, and “Project”.
Highlight actions based on urgency
The default configuration of the task view does little to call attention to next actions that require your focus. With the exception of those that are past-due, they’re all displayed in one monotonous style. We can correct this to highlight critical tasks, and de-emphasize others. Illustrated in the screenshot of my Task View configuration, I have made these enhancements:
- Tasks due today are shown in a slightly larger, bold, green font
- Tasks that recur are shown in an italic font
- Tasks that are due “soon” (in the coming week) are shown in a slightly larger, blue font
- Tasks that have no due date are shown in a lighter grey
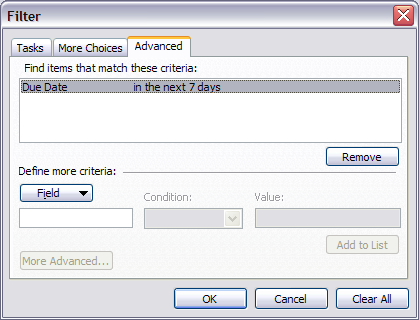
This is quite simple to set up. First, call up the “Automatic Formatting” dialog by selecting the menus “View / Arrange By / Current View / Customize Current View” and pressing the “Automatic Formatting” button, which brings up this dialog:
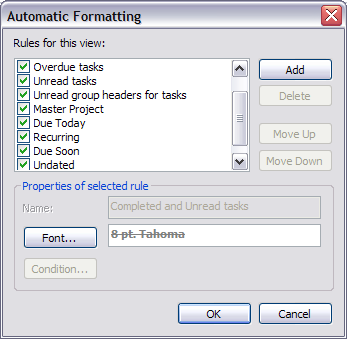
Using the “Add” button, add four new formatting rules, which I’ve named “Due Today”, “Recurring”, “Due Soon”, and “Undated”. Although you can enter them all at once, since you must apply some conditional formatting, it may be better to complete them one at a time, as I’ll describe here. Since these four rules actually complement each other, it’s important to insert them in the illustrated order, or the resulting formatting may be incorrect.
- Due Today
Press the “Font” button, then select “Green” in “Color” under the “Effects” area in the new dialog that comes up. Additionally, select “Bold” from “Font style”, then press “OK” to confirm the change.
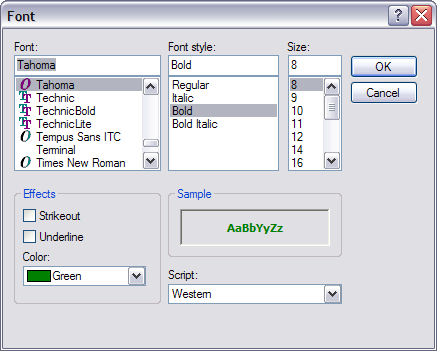
Press the “Condition” button, then select the “Advanced” tab. From the “Field” dropdown, select “All Task fields / Due Date”. From the “Condition” dropdown select “today”. Then, press the “Add to List” button. Press “OK” to confirm the change.

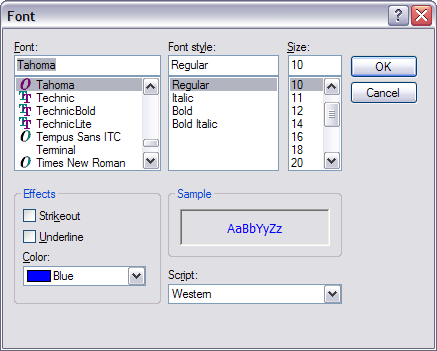
- Recurring
Press the “Font” button, then select “Italic” in “Font style” in the new dialog that comes up, then press “OK” to confirm the change.
Press the “Condition” button, then select the “Advanced” tab. From the “Field” dropdown, select “All Task fields / Recurring”. From the “Condition” dropdown select “equals”, and from the “Value” dropdown select “Yes”. Then, press the “Add to List” button. Press “OK” to confirm the change.

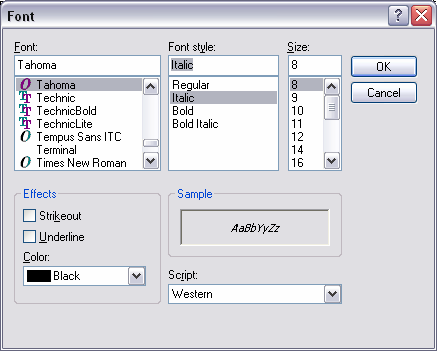
- Due Soon
Press the “Font” button, then select “Blue” in “Color” under the “Effects” area in the new dialog that comes up, then press “OK” to confirm the change.
Press the “Condition” button, then select the “Advanced” tab. From the “Field” dropdown, select “All Task fields / Due Date”. From the “Condition” dropdown select “in the next 7 days”. Then, press the “Add to List” button. Press “OK” to confirm the change.
- Undated
Press the “Font” button, then select “Gray” in “Color” under the “Effects” area in the new dialog that comes up, then press “OK” to confirm the change.
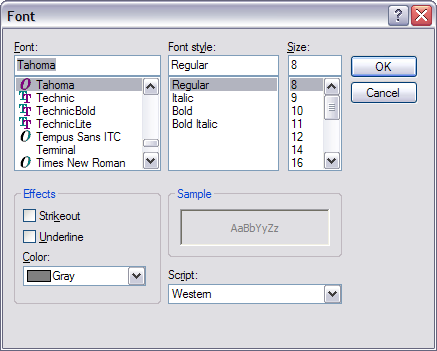
Press the “Condition” button, then select the “Advanced” tab. From the “Field” dropdown, select “All Task fields / Due Date”. From the “Condition” dropdown select “does not exist”. Then, press the “Add to List” button. Press “OK” to confirm the change.

When you have completed all these actions, confirm the “Automatic Formatting” dialog by pressing the “OK” button, and confirm the “Customize View” dialog by pressing its “OK” button.
posted by Anonymous at 5:42 PM
![]()
![]()

0 Comments:
Post a Comment
<< Home